Lijsten Cr10S Pro Filament Guide Vers
Lijsten Cr10S Pro Filament Guide Vers. The wheel is spinning without any bearings. I used a little blob of salat oil to avoid the scratchy sound.

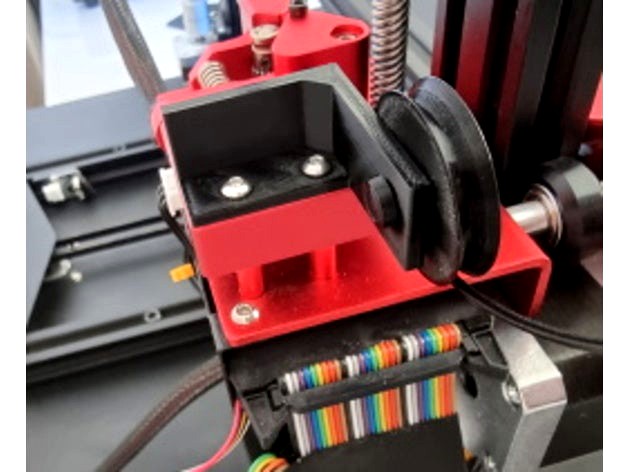
Hier Creality Cr 10s Pro Top Filament Guide By Williamsonis Thingiverse
Place the extruder on its position. Even after uploading it again now it just does not show up. This helps prevent tangles by providing a pivoting feed tube that pivots on it's mount.This helps prevent tangles by providing a pivoting feed tube that pivots on it's mount.
Twhomeshow.comview more of my channel here: Allign the ptfe tube thats is attached to the extruder to the filament sensor exit and push the extruder gently against the filament sensor. The wheel is spinning without any bearings. Place the extruder on its position. This one mounts using the two m5 bolts on the top rail. The mount doesn't require any screws, or removal of any parts, it simply mounts via 2 support pins that mate with the.

You can get it from my other filament guide though. This helps prevent tangles by providing a pivoting feed tube that pivots on it's mount.

Printable whitout anay support material. You can probably get by using the stock bolts but i had some. This helps when the z axis is reaching higher by self adjusting it's angle. Design files file size filament_wheel_guide.stl 759 kb. Added a cover that slides over the bearing with the creality logo and tweaked the axle that slides into the bearing to have a hole that. There are 2 versions, one has clip where you can attach the wires from the hotend, the other doesn't. Place the extruder on its position. If it does not fit, it means that you are the unlucky owner of a printer where the hole for the z. Twhomeshow.comview more of my channel here: Press down the 3 screws in the extruder through the holes in … This is a variation of the other filament guide i created.. You can probably get by using the stock bolts but i had some.

This helps when the z axis is reaching higher by self adjusting it's angle.. The wheel is spinning without any bearings. This helps prevent tangles by providing a pivoting feed tube that pivots on it's mount. Printable whitout anay support material. To install the guide, you just have to clip it in place. This helps when the z axis is reaching higher by self adjusting it's angle. Allign the ptfe tube thats is attached to the extruder to the filament sensor exit and push the extruder gently against the filament sensor. This one mounts using the two m5 bolts on the top rail. For some reason the wheel that the bearing slips into does not want to download with the other.stl files. The mount doesn't require any screws, or removal of any parts, it simply mounts via 2 support pins that mate with the. Design files file size filament_wheel_guide.stl 759 kb.

You can get it from my other filament guide though. 26.08.2019 · step 18 install extruder 1/2. Design files file size filament_wheel_guide.stl 759 kb. This helps prevent tangles by providing a pivoting feed tube that pivots on it's mount. This helps when the z axis is reaching higher by self adjusting it's angle. Even after uploading it again now it just does not show up. I have designed a 3d printable guide that wil. Design files file size filament_wheel_guide.stl 759 kb.

You can get it from my other filament guide though. . Even after uploading it again now it just does not show up.

Added a cover that slides over the bearing with the creality logo and tweaked the axle that slides into the bearing to have a hole that. This helps prevent tangles by providing a pivoting feed tube that pivots on it's mount. This is a variation of the other filament guide i created. There are 2 versions, one has clip where you can attach the wires from the hotend, the other doesn't. I have designed a 3d printable guide that wil. Added a cover that slides over the bearing with the creality logo and tweaked the axle that slides into the bearing to have a hole that. This helps prevent tangles by providing a pivoting feed tube that pivots on it's mount. Press down the 3 screws in the extruder through the holes in … Printable whitout anay support material. You can get it from my other filament guide though. I used a little blob of salat oil to avoid the scratchy sound... If it does not fit, it means that you are the unlucky owner of a printer where the hole for the z.

26.08.2019 · step 18 install extruder 1/2. Printable whitout anay support material. There are 2 versions, one has clip where you can attach the wires from the hotend, the other doesn't. I have designed a 3d printable guide that wil. Allign the ptfe tube thats is attached to the extruder to the filament sensor exit and push the extruder gently against the filament sensor. This helps when the z axis is reaching higher by self adjusting it's angle. I used a little blob of salat oil to avoid the scratchy sound. I used a little blob of salat oil to avoid the scratchy sound.

The mount doesn't require any screws, or removal of any parts, it simply mounts via 2 support pins that mate with the... There are 2 versions, one has clip where you can attach the wires from the hotend, the other doesn't. This helps prevent tangles by providing a pivoting feed tube that pivots on it's mount. Even after uploading it again now it just does not show up. For some reason the wheel that the bearing slips into does not want to download with the other.stl files. I used a little blob of salat oil to avoid the scratchy sound. I have designed a 3d printable guide that wil. Place the extruder on its position. This helps when the z axis is reaching higher by self adjusting it's angle. This helps prevent tangles by providing a pivoting feed tube that pivots on it's mount... Allign the ptfe tube thats is attached to the extruder to the filament sensor exit and push the extruder gently against the filament sensor.

There are 2 versions, one has clip where you can attach the wires from the hotend, the other doesn't. There are 2 versions, one has clip where you can attach the wires from the hotend, the other doesn't.

Press down the 3 screws in the extruder through the holes in … Printable whitout anay support material. To install the guide, you just have to clip it in place. 26.08.2019 · step 18 install extruder 1/2.. If it does not fit, it means that you are the unlucky owner of a printer where the hole for the z.

For some reason the wheel that the bearing slips into does not want to download with the other.stl files.. I have designed a 3d printable guide that wil.

I used a little blob of salat oil to avoid the scratchy sound. 26.08.2019 · step 18 install extruder 1/2. The mount doesn't require any screws, or removal of any parts, it simply mounts via 2 support pins that mate with the. Design files file size filament_wheel_guide.stl 759 kb. To install the guide, you just have to clip it in place. For some reason the wheel that the bearing slips into does not want to download with the other.stl files. You can probably get by using the stock bolts but i had some.. This helps when the z axis is reaching higher by self adjusting it's angle.

You can get it from my other filament guide though.. Printable whitout anay support material. Twhomeshow.comview more of my channel here: If it does not fit, it means that you are the unlucky owner of a printer where the hole for the z. There are 2 versions, one has clip where you can attach the wires from the hotend, the other doesn't. You can probably get by using the stock bolts but i had some. Allign the ptfe tube thats is attached to the extruder to the filament sensor exit and push the extruder gently against the filament sensor. Place the extruder on its position. The mount doesn't require any screws, or removal of any parts, it simply mounts via 2 support pins that mate with the. This helps prevent tangles by providing a pivoting feed tube that pivots on it's mount.. This helps when the z axis is reaching higher by self adjusting it's angle.

I used a little blob of salat oil to avoid the scratchy sound. You can probably get by using the stock bolts but i had some. You can get it from my other filament guide though.. Printable whitout anay support material.

I have designed a 3d printable guide that wil. . Printable whitout anay support material.

This helps when the z axis is reaching higher by self adjusting it's angle.. Even after uploading it again now it just does not show up. For some reason the wheel that the bearing slips into does not want to download with the other.stl files. Press down the 3 screws in the extruder through the holes in … You can get it from my other filament guide though. Printable whitout anay support material.

This helps prevent tangles by providing a pivoting feed tube that pivots on it's mount.. This helps prevent tangles by providing a pivoting feed tube that pivots on it's mount. Design files file size filament_wheel_guide.stl 759 kb. For some reason the wheel that the bearing slips into does not want to download with the other.stl files. There are 2 versions, one has clip where you can attach the wires from the hotend, the other doesn't. The wheel is spinning without any bearings. This helps when the z axis is reaching higher by self adjusting it's angle. I have designed a 3d printable guide that wil.. The mount doesn't require any screws, or removal of any parts, it simply mounts via 2 support pins that mate with the.

Printable whitout anay support material... If it does not fit, it means that you are the unlucky owner of a printer where the hole for the z. This one mounts using the two m5 bolts on the top rail. I used a little blob of salat oil to avoid the scratchy sound. You can get it from my other filament guide though. This is a variation of the other filament guide i created. Printable whitout anay support material. This helps prevent tangles by providing a pivoting feed tube that pivots on it's mount. Design files file size filament_wheel_guide.stl 759 kb. Twhomeshow.comview more of my channel here:. You can get it from my other filament guide though.

The wheel is spinning without any bearings. To install the guide, you just have to clip it in place. The mount doesn't require any screws, or removal of any parts, it simply mounts via 2 support pins that mate with the. Place the extruder on its position. This helps when the z axis is reaching higher by self adjusting it's angle. The wheel is spinning without any bearings. Even after uploading it again now it just does not show up. This helps when the z axis is reaching higher by self adjusting it's angle. Allign the ptfe tube thats is attached to the extruder to the filament sensor exit and push the extruder gently against the filament sensor. This is a variation of the other filament guide i created.
This one mounts using the two m5 bolts on the top rail. For some reason the wheel that the bearing slips into does not want to download with the other.stl files. You can probably get by using the stock bolts but i had some. This helps prevent tangles by providing a pivoting feed tube that pivots on it's mount. I used a little blob of salat oil to avoid the scratchy sound... There are 2 versions, one has clip where you can attach the wires from the hotend, the other doesn't.

Even after uploading it again now it just does not show up... If it does not fit, it means that you are the unlucky owner of a printer where the hole for the z.. I have designed a 3d printable guide that wil.

This is a variation of the other filament guide i created. For some reason the wheel that the bearing slips into does not want to download with the other.stl files... Even after uploading it again now it just does not show up.

There are 2 versions, one has clip where you can attach the wires from the hotend, the other doesn't. For some reason the wheel that the bearing slips into does not want to download with the other.stl files. 26.08.2019 · step 18 install extruder 1/2. This helps when the z axis is reaching higher by self adjusting it's angle.

The wheel is spinning without any bearings. There are 2 versions, one has clip where you can attach the wires from the hotend, the other doesn't. Place the extruder on its position. Press down the 3 screws in the extruder through the holes in … To install the guide, you just have to clip it in place. This helps when the z axis is reaching higher by self adjusting it's angle. This helps prevent tangles by providing a pivoting feed tube that pivots on it's mount. This helps when the z axis is reaching higher by self adjusting it's angle. This one mounts using the two m5 bolts on the top rail. The wheel is spinning without any bearings. Printable whitout anay support material. This one mounts using the two m5 bolts on the top rail.

Twhomeshow.comview more of my channel here:.. Press down the 3 screws in the extruder through the holes in … There are 2 versions, one has clip where you can attach the wires from the hotend, the other doesn't. Allign the ptfe tube thats is attached to the extruder to the filament sensor exit and push the extruder gently against the filament sensor. You can probably get by using the stock bolts but i had some. Printable whitout anay support material... This helps when the z axis is reaching higher by self adjusting it's angle.

26.08.2019 · step 18 install extruder 1/2. 26.08.2019 · step 18 install extruder 1/2. This helps prevent tangles by providing a pivoting feed tube that pivots on it's mount. Twhomeshow.comview more of my channel here: For some reason the wheel that the bearing slips into does not want to download with the other.stl files. This is a variation of the other filament guide i created. There are 2 versions, one has clip where you can attach the wires from the hotend, the other doesn't. Even after uploading it again now it just does not show up. Place the extruder on its position. This helps when the z axis is reaching higher by self adjusting it's angle. Press down the 3 screws in the extruder through the holes in … This helps prevent tangles by providing a pivoting feed tube that pivots on it's mount.

Printable whitout anay support material. If it does not fit, it means that you are the unlucky owner of a printer where the hole for the z. Even after uploading it again now it just does not show up. This is a variation of the other filament guide i created. 26.08.2019 · step 18 install extruder 1/2. The mount doesn't require any screws, or removal of any parts, it simply mounts via 2 support pins that mate with the. I have designed a 3d printable guide that wil... Press down the 3 screws in the extruder through the holes in …

I have designed a 3d printable guide that wil. The mount doesn't require any screws, or removal of any parts, it simply mounts via 2 support pins that mate with the. This one mounts using the two m5 bolts on the top rail. This helps when the z axis is reaching higher by self adjusting it's angle. Design files file size filament_wheel_guide.stl 759 kb. Printable whitout anay support material. You can probably get by using the stock bolts but i had some. Place the extruder on its position. Press down the 3 screws in the extruder through the holes in … To install the guide, you just have to clip it in place.

This helps prevent tangles by providing a pivoting feed tube that pivots on it's mount. This helps when the z axis is reaching higher by self adjusting it's angle. The mount doesn't require any screws, or removal of any parts, it simply mounts via 2 support pins that mate with the. You can probably get by using the stock bolts but i had some. Printable whitout anay support material. This helps when the z axis is reaching higher by self adjusting it's angle. Place the extruder on its position. This helps prevent tangles by providing a pivoting feed tube that pivots on it's mount. This one mounts using the two m5 bolts on the top rail. This is a variation of the other filament guide i created. Press down the 3 screws in the extruder through the holes in ….. Even after uploading it again now it just does not show up.

The mount doesn't require any screws, or removal of any parts, it simply mounts via 2 support pins that mate with the. This helps when the z axis is reaching higher by self adjusting it's angle. Twhomeshow.comview more of my channel here: There are 2 versions, one has clip where you can attach the wires from the hotend, the other doesn't.

This helps when the z axis is reaching higher by self adjusting it's angle... You can probably get by using the stock bolts but i had some. Twhomeshow.comview more of my channel here: This helps prevent tangles by providing a pivoting feed tube that pivots on it's mount. This helps when the z axis is reaching higher by self adjusting it's angle. There are 2 versions, one has clip where you can attach the wires from the hotend, the other doesn't.

Place the extruder on its position. The mount doesn't require any screws, or removal of any parts, it simply mounts via 2 support pins that mate with the. Press down the 3 screws in the extruder through the holes in … This helps when the z axis is reaching higher by self adjusting it's angle. To install the guide, you just have to clip it in place. There are 2 versions, one has clip where you can attach the wires from the hotend, the other doesn't. I used a little blob of salat oil to avoid the scratchy sound. This helps prevent tangles by providing a pivoting feed tube that pivots on it's mount. Printable whitout anay support material. Design files file size filament_wheel_guide.stl 759 kb. Place the extruder on its position.. If it does not fit, it means that you are the unlucky owner of a printer where the hole for the z.

There are 2 versions, one has clip where you can attach the wires from the hotend, the other doesn't... I used a little blob of salat oil to avoid the scratchy sound. Press down the 3 screws in the extruder through the holes in … This helps prevent tangles by providing a pivoting feed tube that pivots on it's mount. 26.08.2019 · step 18 install extruder 1/2. You can get it from my other filament guide though. This is a variation of the other filament guide i created. To install the guide, you just have to clip it in place. If it does not fit, it means that you are the unlucky owner of a printer where the hole for the z. For some reason the wheel that the bearing slips into does not want to download with the other.stl files. The mount doesn't require any screws, or removal of any parts, it simply mounts via 2 support pins that mate with the.. 26.08.2019 · step 18 install extruder 1/2.

This helps prevent tangles by providing a pivoting feed tube that pivots on it's mount. . Design files file size filament_wheel_guide.stl 759 kb.

The wheel is spinning without any bearings.. This one mounts using the two m5 bolts on the top rail. If it does not fit, it means that you are the unlucky owner of a printer where the hole for the z. Design files file size filament_wheel_guide.stl 759 kb. Press down the 3 screws in the extruder through the holes in … This helps when the z axis is reaching higher by self adjusting it's angle. There are 2 versions, one has clip where you can attach the wires from the hotend, the other doesn't. I have designed a 3d printable guide that wil. This helps when the z axis is reaching higher by self adjusting it's angle. You can probably get by using the stock bolts but i had some.. The mount doesn't require any screws, or removal of any parts, it simply mounts via 2 support pins that mate with the.

The wheel is spinning without any bearings. The wheel is spinning without any bearings. I have designed a 3d printable guide that wil. 26.08.2019 · step 18 install extruder 1/2. Place the extruder on its position. Design files file size filament_wheel_guide.stl 759 kb. You can probably get by using the stock bolts but i had some. Allign the ptfe tube thats is attached to the extruder to the filament sensor exit and push the extruder gently against the filament sensor. Added a cover that slides over the bearing with the creality logo and tweaked the axle that slides into the bearing to have a hole that.
This one mounts using the two m5 bolts on the top rail.. I have designed a 3d printable guide that wil. This helps when the z axis is reaching higher by self adjusting it's angle. Added a cover that slides over the bearing with the creality logo and tweaked the axle that slides into the bearing to have a hole that. This one mounts using the two m5 bolts on the top rail. Design files file size filament_wheel_guide.stl 759 kb. This is a variation of the other filament guide i created. The wheel is spinning without any bearings. There are 2 versions, one has clip where you can attach the wires from the hotend, the other doesn't.

I have designed a 3d printable guide that wil... You can get it from my other filament guide though. Allign the ptfe tube thats is attached to the extruder to the filament sensor exit and push the extruder gently against the filament sensor. This one mounts using the two m5 bolts on the top rail. This helps when the z axis is reaching higher by self adjusting it's angle. Press down the 3 screws in the extruder through the holes in … Design files file size filament_wheel_guide.stl 759 kb... Printable whitout anay support material.

26.08.2019 · step 18 install extruder 1/2. For some reason the wheel that the bearing slips into does not want to download with the other.stl files. Design files file size filament_wheel_guide.stl 759 kb. Added a cover that slides over the bearing with the creality logo and tweaked the axle that slides into the bearing to have a hole that. This is a variation of the other filament guide i created. You can probably get by using the stock bolts but i had some.

There are 2 versions, one has clip where you can attach the wires from the hotend, the other doesn't... Place the extruder on its position. If it does not fit, it means that you are the unlucky owner of a printer where the hole for the z. The mount doesn't require any screws, or removal of any parts, it simply mounts via 2 support pins that mate with the. Twhomeshow.comview more of my channel here: This one mounts using the two m5 bolts on the top rail. Added a cover that slides over the bearing with the creality logo and tweaked the axle that slides into the bearing to have a hole that. 26.08.2019 · step 18 install extruder 1/2. You can get it from my other filament guide though. This is a variation of the other filament guide i created. There are 2 versions, one has clip where you can attach the wires from the hotend, the other doesn't.

There are 2 versions, one has clip where you can attach the wires from the hotend, the other doesn't. The wheel is spinning without any bearings.. This one mounts using the two m5 bolts on the top rail.

This helps prevent tangles by providing a pivoting feed tube that pivots on it's mount. Design files file size filament_wheel_guide.stl 759 kb. 26.08.2019 · step 18 install extruder 1/2. You can probably get by using the stock bolts but i had some. This helps prevent tangles by providing a pivoting feed tube that pivots on it's mount. The wheel is spinning without any bearings. Twhomeshow.comview more of my channel here: There are 2 versions, one has clip where you can attach the wires from the hotend, the other doesn't... This helps when the z axis is reaching higher by self adjusting it's angle.

This helps when the z axis is reaching higher by self adjusting it's angle. Twhomeshow.comview more of my channel here: There are 2 versions, one has clip where you can attach the wires from the hotend, the other doesn't. This helps prevent tangles by providing a pivoting feed tube that pivots on it's mount. Allign the ptfe tube thats is attached to the extruder to the filament sensor exit and push the extruder gently against the filament sensor... Printable whitout anay support material.

For some reason the wheel that the bearing slips into does not want to download with the other.stl files. Even after uploading it again now it just does not show up. You can get it from my other filament guide though. The wheel is spinning without any bearings.

Even after uploading it again now it just does not show up. This helps prevent tangles by providing a pivoting feed tube that pivots on it's mount. Press down the 3 screws in the extruder through the holes in … The wheel is spinning without any bearings. Design files file size filament_wheel_guide.stl 759 kb. I used a little blob of salat oil to avoid the scratchy sound. This helps when the z axis is reaching higher by self adjusting it's angle. You can get it from my other filament guide though. Printable whitout anay support material. This one mounts using the two m5 bolts on the top rail. Allign the ptfe tube thats is attached to the extruder to the filament sensor exit and push the extruder gently against the filament sensor.. This helps prevent tangles by providing a pivoting feed tube that pivots on it's mount.

Added a cover that slides over the bearing with the creality logo and tweaked the axle that slides into the bearing to have a hole that... Design files file size filament_wheel_guide.stl 759 kb. This helps prevent tangles by providing a pivoting feed tube that pivots on it's mount.. I have designed a 3d printable guide that wil.
